Monday, May 8, 2017

Download and Convert Facebook HD Video on macOS Sierra

There are many funny HD video clips on FaceBook. You maybe want to download them to play on your iPhone, iPad, Samsung Tablet or edit the downloaded FaceBook video on iMovie, FCP X/6/7. When we download FaceBook HD video, only one format can be chosen so that sometimes, this format video can be played on your multimedia devices but can't be edit with some video editing tools. In many cases like this, you need to convert downloaded FaceBook video files on your Mac. So here let's learn how to download and transcode FaceBook HD video files.

Part 1: Download FaceBook HD Video

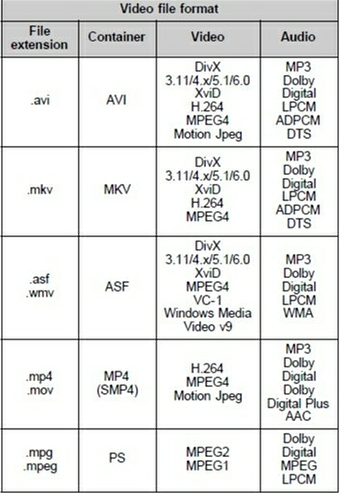
There are many online FaceBook downloader sites from which you can easily download FaceBook 480P, 720P, 1080P video in MP4, MKV, WMV, AVI formats.

Popular FaceBook video download sites have:

www.fbdown.net/

www.downvids.net/

www.filevid.com/

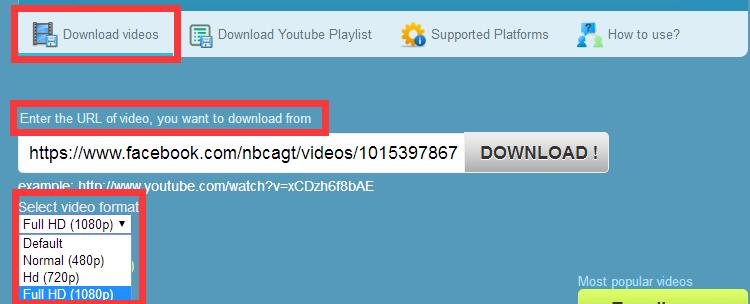
It is easy to use this FaceBook video downloader to download FaceBook HD video files. Here take downvids.net as an example. You can download FaceBook HD video files as the steps shows: 

1. Click www.downvids.net/ to open the site.

2. Click "Download Video" at the top menu.

3. Paste the FaceBook video URL address you want to download.

4. Choose the video format and resolution you want.

5. Hit grey DOWNLOAD button to download FaceBook video you want. 

download FaceBook video

Part 2: Convert Downloaded FaceBook HD Video on Mac including macOS Sierra

To convert FaceBook HD video, you need a video converter. Here we choose Pavtube iMedia Converter for Mac cause this powerful video transcoder can convert FaceBook SD/HD FLV, MKV, AVI, WMV, MP4 video to any other format video and even convert FaceBook video to MP3, MWA, MKA, AAC audio files.

Free download and purchase:

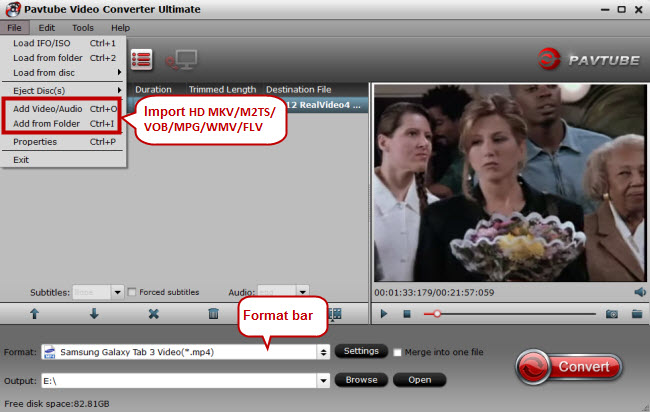
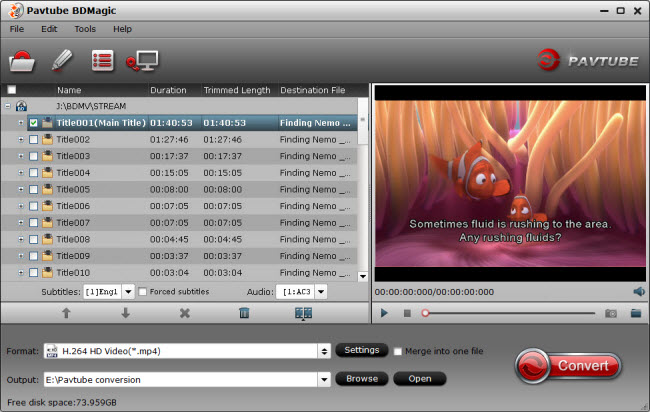
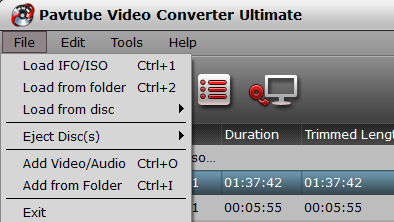
Step 1: Free download the FB Video converter on macOS Sierra and launch it. Click "File" to load Facebook video files.

load file

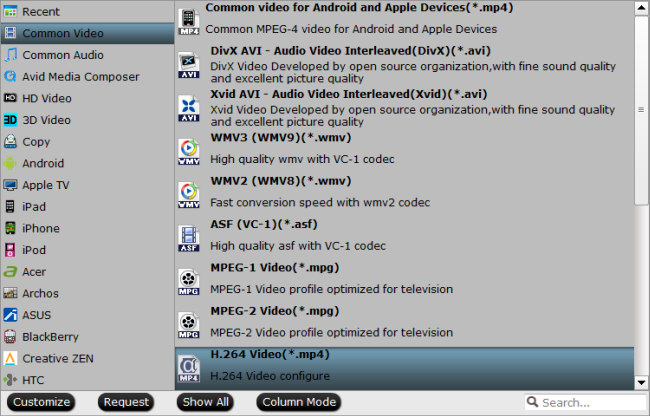
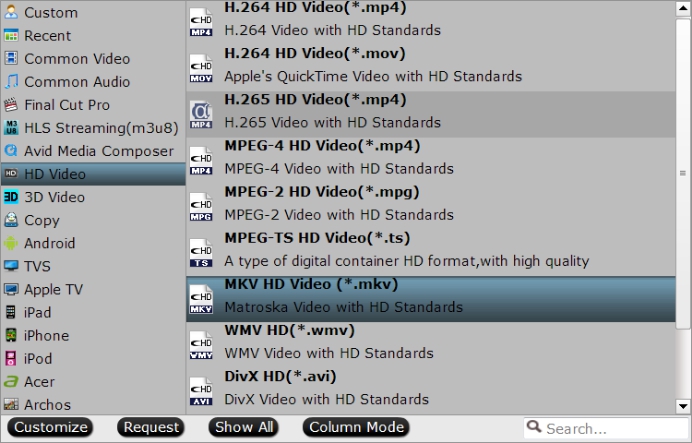
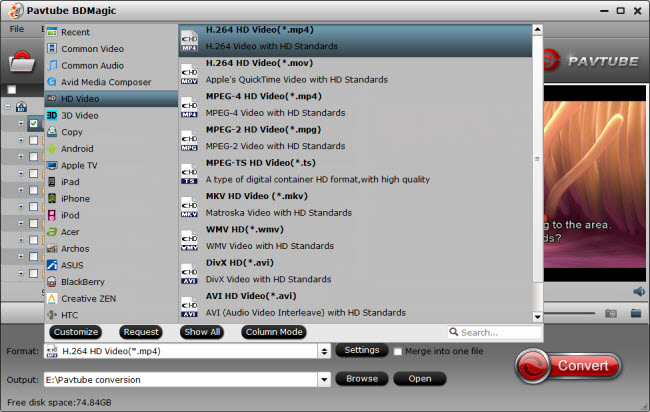
Step 2: Click Format panel to choose format for output files. You can choose the one that meets your devices or players most.

mp4 format

Click the settings button next to the Profile frame to specify parameters for output files. You can reset Video Codec, Quality, Video size (choose output video size from provided options, or manually input the size you desire into the box according to your devices or players), Bit Rate, Frame Rate, Aspect ratio, Audio Codec, Audio Quality, Sample rate, Channels, etc.

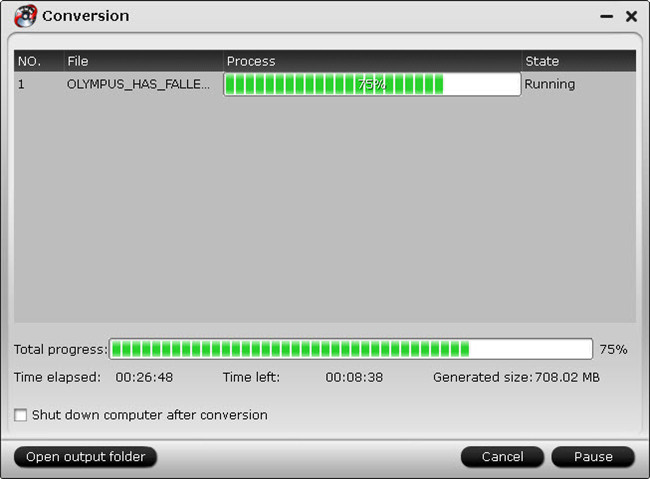
Step 3: Back to the main interface and click the “Convert” button to convert FaceBook HD video to various video and audio formats. You can see the converting progress, time, size, etc.

Now, you can transfer your converted FB video to any devices to play or edit them in iMovie, FCP.

 Source: https://media-playback.jimdo.com

Related Articles:

Free YouTube to MP3 Converters on Mac OS X | Mac VOB to iPad 3 Converter 

Import and Edit 4K Video with iMovie  | Convert MXF to AVI/WMV/MOV/MP4/MPEG on Mac 

Edit PowerShot G7X Mark II MP4 on Mac | Play MKV Files with QuickTime Player on Mac

Best Sony XAVC/XAVC S Video Converter for Mac | Copy blu-ray to iTunes on Mac

Rip Blu-ray movie to DVD on Mac OS X | Rip commercial DVDs on Mac

Free Burn AVI, MKV, MP4 to DVD on Mac | Back up and Burn a Blu-ray with Mac

Tuesday, May 2, 2017

Will Sharp TV play AVI files on USB/External drive?

Have you stored some AVI videos on External drive or USB Flash drive? Do you want to play AVI files on Sharp 4K TV from USB port? What kind of TV converter we can use on Windows/Mac ? How to send the converter files to Sharp 4K TV? May be found in this article good advice to you.

When you play movies on sharp 4K TV through USB or External drive, the TV said the format is not supported by sharp 4K TV. In this time you maybe want to known what should we do to solve this problem.

Reason to Sharp TV Can’t Play AVI files

At the first what format files on Sharp TV supported:


According to this, it supports AVI as well as MP4, MOV, MKV, WMV, MPG. But Sharp TV AVI in Divx/Xvid video codec and MP3 Audio codec. However, AVI format is a container format which has many different video and audio codecs, your Sharp TV will failed to play unsupported AVI files due to the video/audio codec limitation. So, how to smoothly play any AVI videos on Sharp TV from USB or External Drive?

Note: You can know the video codec, audio codec, frame, size... of AVI video via MediaInfo.

How to Play Unsupported AVI on Sharp TV via USB or External drive?

To break the format restrictions for Sharp TV, you just need to convert Unsupported AVI files to be support by Sharp TV with a third party software. Pavtube Video Converter Ultimate is higher recommended for you,  which is a powerful video player, editor, and conversion tool for Windows and Mac. With it, you can re-encode any AVI videos to Sharp TV supported AVI Files with Divx/Xvid video codec and MP3 audio codec or Sharp TV supported MP4 format with H.264 video and MP3/AAC audio codec (The best format for Sharp TV is MP4 format.). And then you won’t have any playback problems.

Plus, Pavtube Video Converter Ultimate focuses on ease of use, converting your chosen video with the absolute minimum of hassle.  It's great at transcoding, but it's also a great organizational tool for all of your video and audio, such as: H.265, MKV, MP4, MOV, WMV, MPG, Tivo, Blu-ray/DVD movies and ISO image files etc. It's very fast, flexible and safe.

Nutshell, the TV Converter gets the job done and can convert just about anything to just about anything else quickly, easily, and without complaining—and that's what's important.

Now, you can free download it as a try


Other Download:
- Pavtube old official address: http://www.pavtube.cn/blu-ray-video-converter-ultimate/
- Cnet Download: http://download.cnet.com/Pavtube-Video-Converter-Ultimate/3000-2194_4-75938564.html

Following our exhaustive tests, Pavtube Video Converter Ultimate is the applications we feel performed the best. 

This program has every tool and feature we looked for in the best video converters. It has a healthy selection of both common(AVI, MKV, MP4, VOB, MPG, Tivo, WMV, etc.) and uncommon video formats(H.265, XAVC, Prores, etc.), and the converted video was as close to perfect as can be reasonably expected for Sharp TV. The most impressive aspect of this video converter is how quick it is as well as lossless quality output. The whole workflow is very easy to use for beginner. 

How to Re-encode Unsupported AVI to Sharp TV Supported formats?

Step1: Load files

drag AVI files to the software interface to import the file, batch conversion is supported so you can add multiple files to convert at a time.


Step 2.Set output format for Sharp TV

Clicking the Format bar, Click Format bar to select a proper format like MP4 or AVI format(with H.264 video and MP3/AAC audio codec )from HD Video profile, which can be viewed on Sharp TV perfectly.


Step 3: Additional bonuses

Attach SRT, ASS, or SSA subtitles into original video to create the personal movie for watching. If you want add Subtitles(srt, ass, ssa) to your movie for playing on Sharp TV. (Subtitle FAQs)You also can adjust aspect ratio, bit rate, etc.


Step 4:Start conversion press

Convert button on the main interface to start converting AVI files to Sharp TV/USB supported format. With NVIDIA CUDA and AMD APP technology, you can enjoy a faster video conversion.


Now you can play any AVI videos from UBS on Sharp TV and enjoy.

3 Ways to Stream Videos from PC to Sharp TV

Method 1. Data cable connection

Transfer your window has been converting formatted files on the USB or SD ports then plug in USB or SD ports on Sharp TV. 

Method 2. Wireless screen casting system

Using wireless screen casting system that allows you to mirror your phone's screen on your high definition, smart Sharp TV.

Method 3. Mobile Apps

Setting up the connection is established, how do you make everything work well. To send the converter files to Sharp TV. Be carefully, a missed step in the initial configuration may result in the failure to connect with your Sharp Smart TV.

Additional Tips:

If you’re Apple users, Media Player for Sharp TV app also is recommended to you. Simply download this app to play videos, photos and music directly from your iPhone/iPod device to your Sharp TV.  

Related articles

Play MP4 Files on Sony TV | Play MP4 Files on Vizio TV 

Play iPhone 4K video on TV | Play H.265 on LG TV

Play H.265 on WD TV | Stream FDR AX-100 XAVC S 4K to playback on 4K TV

Play PowerPoint video on Samsung TV | Play HEVC/X265 Video On Samsung TV

Play Blu-Ray On Samsung Smart TV | View 4K videos on Samsung TV via Roku 4

Move Blu-ray/DVD to HTPC for Samsung TV | Play AVI on Samsung TV

Play 3D MKV on Samsung | Play 3D ISO files on Samsung 3D Smart TV

Convert Oscars Blu-rays to Samsung BD-JM57C | Rip Blu-ray to Western Digital Media Server

Stream Ex Machina Bluray on Samsung TV | Rip 3D M2TS To 3D MP4 For Panasonic

Rip and Backup Family DVD to NAS | Rip DVD/Blu-ray for Playing on Samsung TV

Monday, April 24, 2017

Play Blu-ray on LG Netcast/WebOS TV with Plex

Great home theater isn’t just about the biggest, smartest TV or the most sophisticated sound system. Maybe you have collected some Blu-ray discs and want to play them on LG Netcast/WebOS TV with Plex? Yes, The Plex app is made available through the Smart TV alliance for LG Netcast/WebOS televisions. But Blu-ray disc is not played direclt on LG Netcast/WebOS TV with Plex. Read on this guide to learn how to play Blu-ray on LG Netcast/WebOS TV with Plex smoothly.

Best Tool to Play Blu-ray on LG Netcast/WebOS TV with Plex

Since LG Netcast/WebOS TV and plex don’t support playing Blu-ray movies, you can rip your Blu-ray. Just choose a Blu-ray ripper to LG Netcast/WebOS TV and Plex supported video for smooth playing. Today, the DVD Ripper we prefer to use to rip Blu-ray to LG Netcast/WebOS TV/Plex is Pavtube ByteCopy. Just like any other powerful Blu-ray ripping too, it can convert Blu-ray to LG Netcast/WebOS TV and Plex supported format with original video quality and high Blu-ray ripping speed. With an intuitive interface, it is easy to use that you can know the next step easily. Mac user just get its Mac version.

Why choose Pavtube ByteCopy ro Rip Blu-ray

  • Rip Blu-ray to LG Netcast/WebOS TV, Plex supported video
  • Rip Blu-ray to LG TV, Samsung TV, Sony TV, Panasonic TV etc supported video
  • 2 ways to copy Blu-ray: Full disc copy, direclt copy
  • Lossless Blu-ray to MKV backup with multiple audio/subtitle tracks
  • Convert Blu-ray to Multi-track MP4, MOV, AVI
  • Export single SRT subtitle file
  • Quick conversion - Brings about conversion at seed of up to 30X.
  • Custom Video: Personalize videos with diversified video editing tools.
  • Allow you to complete the conversion process with three simple clicks.

Free download this Blu-ray ripper for LG Netcast/WebOS TV and Plex

Before ripping Blu-ray, you can learn LG Netcast/WebOS Plex app supported formats including the MKV format. Now follow the detailed guide to learn how to rip Blu-ray to LG Netcast/WebOS Plex app supported format.

How to Convert blu-ray to LG Netcast/WebOS TV and Plex supported video formats?

Step 1. Load Blu-ray

Load Blu-ray disc from optical drive by clicking “File”< “Load File from Disc”.

Step 2. Set output format

Clicking the Format bar, you can choose output format from the format list or customize which formats to be shown on the list. Here you can choose .mp4 from HD Video or Common Video for playing Blu-rayon LG Netcast/WebOS TV with Plex.

Specify output file format

For streaming Blu-ray to LG Netcast/WebOS TV via Plex, directly output LG Netcast/WebOS TV preset profile formats "LG TV(*.mp4)" from "TVs" extended option list.

3. Start Conversion

Clicking the Convert button on main interface, you can go to Conversion window to start this conversion.

Read More:

Stream ISO Files to LG TV | Video_TS Folder on LG Smart TV

Convert Blu-ray/DVD movies to iTunes | Convert Blu-ray to Apple TV

Rip Blu-ray to WD TV | Copy Videos/Movies to WD My Book Series

Play H.265/HEVC to PS4/Plex | Play M2TS Files with Plex

Rip DVD to Apple TV  | Stream 4K Blu-ray on Xbox One S

Play Blu-ray/DVD/Video on LG Ultra 4K TV | Play 4K XAVC S on Plex

Monday, April 17, 2017

Backup Hundreds of Blu-ray and DVD Movies to Cloud Storage

As Internet lines become faster and servers more affordable, online cloud storage is not a sweet concept any more but a modern service you can really count on when backing up your hundreds of Blu-ray and DVD movies. So, this article will show how to backup hundreds of Blu-ray and DVD movies to cloud storage.

Part One: Best Cloud Storage in 2017 to Store Blu-ray and DVD Movies

Online storage is an integral part of life now, but with so many available it's hard to decide which one to use. So, firstly I want to recommend you the top 3 cloud storage for you to choose.


1. JustCloud

JustCloud use a small desktop application where customers can backup all of their files onto the cloud. They also have free apps for iPhone, iPad, Android, Blackberry, Kindle and Windows so you can backup and access files from any device. If you have rare family photos which you would not want to be accidentally deleted or a music library which took you years to collect and organize, then you should definitely think about getting the services of JustCloud.


2. ZipCloud

ZipCloud is just one of the many online backup services providers available on the Internet today. When you take advantage of their service, you will have a simple, safe and secure way of backing up your data. The founders of ZipCloud are Dan Richards and Brooke Bryan. Since the company’s inception, they have consistently been included among the top ten lists of the best online backup sites. Read on to find out more about the features, security, support and overall rating of ZipCloud as an online backup site.

3. SugarSync

SugarSync has their headquarters based in San Mateo, California and they currently have millions of subscribers around the world. The thrust of their campaign is to allow you to use a service which helps you “sync your life”. By simply downloading the software on your computer and mobile devices, you can gain access to everything that the cloud has to offer.


Part Two: How to Backup Hundreds of Blu-ray and DVD Movies to Cloud Storage

So, after knowing which cloud storage to choose, the next important thing you should know is how to backup hundreds of Blu-ray and DVD movies to cloud storage.

Here, I suggest you to use Pavtube BDMagic to rip and convert Blu-ray and DVD to regular video formats for storage on Cloud Storage,  like MP4, MOV, MKV, FLV, WMV, AVI format etc. Considering the limited space of normal cloud storage, the program allows you to lower converted video size by adjusting video parameters. Also considering to the final usage of your converted Blu-ray and DVD movies, the app provides optimized video presets formats for mainstream devices to let your get videos with the best settings to fit your device. Furthermore, the built-in video editor allows you to easily get desired video part and effects. (Review)

For Mac user, you can turn to Pavtube BDMagic for Mac for downloading. The program has updated to support the newest Mac OS X El Capitan.

Free download and install: 


Other Download:
- Pavtube old official address: http://www.pavtube.cn/blu-ray-ripper/
- Cnet Download: http://download.cnet.com/Pavtube-BDMagic/3000-7970_4-75922877.html

Steps to Backup Hundreds of Blu-ray and DVD Movies to Cloud Storage

Step 1. Load DVD/Blu-ray movies

Click “File” to load your Blu-ray/DVD movie to this program. It will automatically choose the main content to convert. If there are several language subtitles in your Blu-ray/DVD movies, you can select the language subtitle you want to show in your movie by “Subtitle”.


Step 2: Set output format

In drop-down format list, you can choose the optimized preset format for your final device. If you have not decided the final usage of your converted video, you can choose “HD Video” > “H.264 HD Video(*.mp4)” as output format for playing on laptops, tablets, mobile phones etc. 


Tips:

1. If you just want to digital your Blu-ray/DVD for more convenient organization and management, you also can choose tofull disc copy Blu-ray/DVD or main title copy.

2. Click “Settings” on the interface and you can adjust the parameters including size, bitrate, frame rate, etc. to get a high quality of output files or a smaller files size. Keep in mind the file size and video quality is based more on bitrate than resolution which means bitrate higher results in big file size, and lower visible quality loss, and vice versa. You can preview the size at the below chart.

Step 3: Start to convert

After all settings done, hit on the “Convert” button and Blu-ray/DVD to cloud storage conversion will start. After the conversion completes, open output folder and you will find the converted movies.

Now, you can backup your hundred of converted Blu-ray and DVD movies to cloud storage now. In addition to Cloud Storage, you can also backup Blu-ray and DVD to Media PlayeriTunes library or External Hard Drive/Thumb Drive etc.

Related Articles:

Backup Blu-ray/DVD for Amazon Cloud Drive

Backup DVD and Blu-ray collections to home server

 Backup 2D/3D Blu-ray Movies on Mac El Capitan

Backup Blu-ray/DVD for My Passport Wireless Storage

Backup Blu-ray to H.265 HEVC MP4 on Mac OS X

Backup Blu-ray/DVD/ISO to Surface Book

Back Up DVD Collection with Mac

Lossless Blu-ray to MKV Backup

Monday, April 10, 2017

How to Trim Movies for Taking out Extra Scenes?

Movies bring great entertainment for most people all over the world. A movie has an ability of influencing our lives whether negatively or positively. In some movies, there may be some touching scenes that you want to cut out to upload to YouTube or Vimeo to share with your friends. But to common people, they maybe don’t know how to trim movies to get the video clip they want. Here, I will share my some experience on trimming movies for taking out extra scene.

For a non-IT savvy people like me, a user-friendly video trimming tool is needed to trim movies. Pavtube Video Converter Ultimate is the best choice, I think, after I attempted many video softwares. It can accurately trim video length to take out the extra scenes so as to get desired video clip from Blu-ray/DVD/4K/HD/SD movies. And it can accept MP4, MKV, AVI, FLV, MOV, etc format movie to trim video footage and change the video clip to another popular format if necessary. For better looking, you can crop the black area of the video clip. (Read 5 reasons to choose Video Converter Ultimate). If you also want to try this brilliant app, download it in the below:

Free download and install
          

Other Download:
- Pavtube old official address: http://www.pavtube.cn/blu-ray-video-converter-ultimate/
- Cnet Download: http://download.cnet.com/Pavtube-Video-Converter-Ultimate/3000-2194_4-75938564.html

How to trim movies for taking out extra scenes?

Step 1: Add source movie to the app

Click “File” menu, and select "Add Video/Audio" or "Add from folder" to import source movie files.


Step 2: Select output format

If your source movie is Blu-ray/DVD and other unusual format, you can change it to a popular video format in “Format”


Step 3: Trim movies to take out extra scenes

Click “Edit” to find “Trim” icon. This icon allows you to decide where to start and where to end when converting the selected movie, so that unwanted scenes will be cut out after conversion.


Tip: The "Crop" facility enables you to get rid of the black edges and unwanted area of the image. Crop video by dragging and dropping the crop frame Simply move your mouse cursor to drag and adjust the green frame to desired position.


Step 4:  Start to trim movies 

Clicking the Convert button on main interface, you can go to Conversion window to start to trim movies for taking out extra scenes.

Now, you get a video clip from the source movie. As you seen, it is easy to trim movies to take out extra scenes with this program. Just try! Also you can look here if you want to trim blu-ray and DVD movies on Mac.

Source: Best way to Trim Movies for Taking out Extra Scenes

Related Article:

Edit movies on the timeline | Lossless Trimming AVCHD Video

Trim and convert HD recordings for HD TV | Edit 4K Video with iMovie on Mac

Trim MTS without re-encoding on Mac | Play 4K Video on PS4 Pro

Trim Sony HDR-XR160E MTS | Split a large video file into several small files

Top 5 Apps to Split or Merge Video Files on Mac | Split Phantom 4 4K video

Thursday, March 30, 2017

Use NVIDIA CUDA Accleration to Rip 4K Blu-ray to H.265 for Xbox One S

If you have a new (and probably quite expensive) 4K HDR TV, then 4K video is amazing — it looks incredible. But to watch a 4K Blu-ray, you need a 4K Blu-ray player, which can set you back quite a few hundred dollars more than regular Blu-ray. If you do want to make that investment, though, the cheapest 4K Blu-ray player actually does a lot more than just play movies. You can buy a 4K-toting Xbox One S for as little as $349, a full $200 cheaper than the least expensive Blu-ray player today.


In addition, if you want to protect your expensive 4K Blu-ray disc, you can rip 4K Blu-ray to HEVC 4K video for Xbox One S playback via Plex, NAS or via USB hard disc. Since HEVC encoding is CPU heavy. You'd better get a Blu-ray Ripping tool that supports NVIDIA CUDA HEVC encoding hardware acceleration.


Pavtube ByteCopy would help you easily rip and convert 4K Blu-ray disc to 4K video so that you could play 4K Blu-ray on Xbox One S as you like.It would be your best choice to rip and convert 4K Blu-ray to Xbox One S videos. This 4K Blu-ray ripper software would rip and convert 4K Blu-ray disc to 4K MP4/MKV video without any quality loss. With it, you have no difficulty to play 4K Blu-ray disc on Xbox One S.


What's more, Pavtube ByteCopy can rip 4K Blu-ray to HEVC MKV with up to 30x times ripping speed utilizing the most advanced hardware acceleration NVIDIA CUDA & AMD APP by H.264/H.265 codec, which can give users video transcoding speed than before. >> Pavtube ByteCopy review.


 Hot Search:

H.264, MP4, MOV, AVI, MKV, FLV to H.265 | 4K H.265 to Android Phone | H.265 on my LG TV | H.265 to YouTuBe

Samsung NX1 H.265 videos to H.265 or H.264 MP4 | H.265/HEVC to WD TV HD/Live/Mini Media Player


How to Rip 4K Blu-ray to H.265 Utilizing CUDA for Xbox One S

Step 1. Load 4K Blu-ray movies


Install and launch the best 4K Blu-ray to H.265 Converter program. Insert your Blu-ray disc into your BD drive, and click “Load from disc” icon to load your 4k Blu-ray movies and DVD discs. You can also import movies files from Blu-ray folder, ISO and DVD folder and DVD ISO/IFO.


Learn: ByteCopy Joined H.265 NVIDIA to 30X Realtime 4K H.265 Encoding


load Blu-ray


Step 2: Set output format

Click “Format”, and follow “HD Video” > “H.264 HD Video (*.mp4).” as the best output video format for Xbox One S 500G/2TB/1TB. Or you can choose " Zune/Xbox 360 Device >> Xbox 360 Video - Windows Media Video(*.wmv)" as the compatible MP4 preset with best video quality. Then click “Settings” on the interface to adjust video codec to H.265. Or you can directly choose H.265 MP4.


h.265 MP4

Step 3. Utilizing Nvidia GPU Hardware Acceleration In ByteCopy


Now, move your cursor to “Tools” button on the top of the main interface to choose“Options”. Then you can enable GPU Encode acceleration. You need to check if your graphic card supports CUDA acceleration from here


Step 3: Start to convert 4k Blu-ray to XBox One S

Hit "Convert" on bottom-right corner to start conversion. When the process is over, you can find the converted files by clicking the "Open output folder".


Now, you are free to enjoy 4K Blu-ray rips on Xbox One S.


Related Articles:

FCP X Guides: Import SD/HD/4K Video to Final Cut Pro X

Final Cut Pro X uses QuickTime technology; almost any QuickTime-compatible file format can be imported and exported. This allows you to import files created in video editing, motion graphics, and photo editing applications. QuickTime compatible file formats include AIFF, MP3, MPEG, WAVE, JPEG, TIFF, etc. A QuickTime movie file uses a .mov file extension. And it is also compatible with MP4, M4V, and QT formats. And as we can see, Final Cut Pro X does not support the video formats mentioned in the title, which are AVI, WMV, RM, MKV, and MPG. Then how to edit those videos in Final Cut Pro X? We could use Pavtube iMedia Converter for Mac to convert the files to compatible formats. Whether you’re new to Final Cut Pro X or just looking to pick up some tips, you can get up to speed quickly by viewing this tutorials. Here are all of handy tips/tricks/FAQ to turbocharge your FCP X entertainment experience.


Final Cut Pro X media formats and workflow:


Best Editing Formats for Final Cut Pro X

Ingest and Import AVCHD to Final Cut Pro

Import footages/videos/projects into Final Cut Pro X

FCP X: Native vs. Optimize vs. Proxy Media

As more and more video camera manufacturers abandon tape-based conventional recording, smaller, more powerful video cameras have evolved, recording increasingly vast amounts of data. With FCP X, Apple shifts its flagship video editor’s emphasis to tapeless, metadata-based shooting and production techniques that accommodate this emerging data-centric workflow. People use digital recording devices to take notes and dictate letters, memos,videos and other correspondence to assistants for transcribing. The development of digital recording recorders has been significantly influenced by the previous generations of dictating equipment from IBM, Dictaphone and other manufacturers. But today’s electronic digital recorders have moved far beyond mere dictation into the world of high-quality recording. When you start to edit your recording files on FCPX,However, there are still some incompatible formats that cannot be imported to FCPX, such like some 4K videos or high definition XAVC videos, etc. So here're some guides for importing camera files into FCPX.


2K/4K Camera Footage to FCP (X/7/6) Solutions


Canon 5D Mark IV 4K MOV to FCP X

Canon XC10 XF-AVC MXF to FCP X

Canon C300 MXF to FCP X

Sony PMW-F55/F5 XAVC files to FCPro X

Sony PXW-X70 XAVC (.mxf) files to FCP X

Sony PXW-Z100 XAVC Videos Compatible with FCP X 

Sony NEX-VG900 AVCHD files to FCP X 

Sony FDR-AXP33 XAVC S MP4 to ProRes MOV for FCP X

Panasonic HC-VX870 AVCHD MTS to FCP X

DJI Mavic Pro 4K video to FCP X

Blackmagic Production Camera 4K Videos to FCP X/7/6


SD/HD Camera Footage to FCP (X/7/6) Solutions


Canon 100D 1080p MOV to FCP X | Canon XF305 MXF to FCP X

Canon XA20 MTS/MP4 to FCP | Canon Rebel t3i (EOS 600D) Footages to FCP X

Canon 6D Footages to FCP X | Canon EOS 700D/Rebel T5i footages to FCP X

Sony PMW-400 XAVC to FCP X | Sony Alpha NEX Cameras MTS to FCP X

Sony HDR CX170 Footages to FCP X | Sony XDCAM camcorder Footages to FCP X

Nikon D7000 MOV Recordings to FCP | Humax recording 1080p videos to FCP

Panasonic TM900 MTS Videos to FCP X | Panasonic MXF Footages to FCPX

Canon/Nikon/Sony/Panasonic/Pentax/Olympus/Fujifilm SLR camera video to FCP X 


If you happen to own some incompatible file formats such as VOB, FLV, MKV, H.265/HEVC, OGG, VC-1/WMV, VP8, VP9, MVC, Real Video, MPEG-1, MPEG-2, etc, you can easily load them into FCP X with the best editing workflow by Pavtube iMedia Converter for Mac , which can professionally generate FCP X best in different file types according to your own needs. Here're some information for you to convert these unsupported formats well.


Videos to FCP (X/7/6) Solutions


Edit 4K Video in FCP X | Edit HD Videos in FCP 7 | Edit H.264 in FCP | Edit H.265/HEVC in FCP X

Edit TS Video in FCP X | Edit M2T video in FCP X | Edit DVD in FCP | Edit VOB Files in Final Cut Pro (X/7/6)

| Edit MP4 in FCP X | Edit MOV in FCP X | Edit AVI in FCP X | Edit MPG in Final Cut Pro X | Edit Youtube Videos in FCP X

Edit ISO image in FCP X | Edit Blu-ray in FCP | Edit MKV in Final Cut ProX | Edit FLV in Final Cut Pro (X/7/6)


The FCPX supported export the following formats as Apple ProRes (all versions),AVC-Intra Class 50/100/200.,DV (including DVCAM, DVCPRO, and DVCPRO50),DVCPRO HD,H.264.,HDV,MPEG IMX (D-10),Uncompressed 10-bit 4:2:2,etc. But when the output format doesn't support you freely play that cause you have to convert the output files to meet the demand. There are some information beside here.


Export FCP footage Solutions


Export FCP to HD Video | Post FCP Project on YouTube/Vimeo

Export FCP to MP4 | Export FCP to Avid | Burn FCP projects to DVD


Other FCP (X/7/6) Tips


The Correct Way to Ingest and Import AVCHD to Final Cut Pro 7

Import and edit HD videos in Final Cut Pro smoothly


The Final Cut Pro X should now be available for download, If you crash into these troble using FCPX that you can try the best tool(Pavtube iMedia Converter for Mac ) to convert your files before editting or sharing. there are many advantages trying use our software.


100% Shop Securely
We value your privacy and protect your financial/personal info with advanced encryption and advanced fraud protection.


Support Service
Knowledgeable representatives available to assist you through instant live chat and email response within 24 hours.


Money-back Guarantee
All of our products come with a 30 Day Money Back Guarantee.


Lifetime Free Update
Regular updates provided for registered users without extra charge for lifetime.


Trusted by Millions
We currently serve more than 30,000,000 customers.


Contact us:

support@pavtube.com
macsupport@pavtube.com

Community:

Facebook

Twitter

Google+