The advantage of this type of backup is that it backs up everything including your installed applications – it is the only built-in backup mechanism that does so. The other mechanisms I covered in this series (Part 1: Save to OneDrive and Part 2: File History) are more focused on protecting your data with the idea that Windows and applications can be easily reinstalled later. While this sounds like an awesome way to keep your system protected, there are a couple of downsides. First, the backups take quite a while and are normally done manually (in contrast, using OneDrive or File History is automatic). Also, the backups are large and each backup is a separate (large) file. You will need a good-sized USB hard drive or network share in order to keep your system image. Finally, they are an “all or nothing” backup.
That means that in order to restore a single file, you need to restore (and overwrite) your entire Surface. As you can image, overwriting all of the files/apps you’ve updated or installed from the date the backup was created (perhaps months ago) might be worse than losing a single file.
For that reason, you should consider a system image a “Disaster Recovery Backup” – i.e. you use it when a disaster has happened like your Surface has been completely wiped or you have such a bad malware infection that you can’t recover it.
Create a System Image Backup in Windows 10
You will have the option to backup to a USB hard drive, multiple DVDs, or a network share. In all of these cases, ensure there is enough space (or blank DVDs) to hold the contents of your hard drive plus about 20% as a cushion for overhead (i.e. if your Surface has 200GB of data on it; you will need at least 240GB of free space to be safe). If you want to backup to multiple DVDs, you will need a USB DVD burner that works with your Surface. Personally, I wouldn’t recommend the DVD option unless you have no other choice.
- Log in with an administrator account and ensure your Surface is plugged into power.
- If you want to back up to a USB hard drive or USB DVD burner, plug it into your Surface. If you plan on using a network share as your backup location, make sure you can connect to it.
- Search for “Backup and Restore” and select the Backup and Restore (Windows 7) option from the search results.
- Choose Create a System Image from the left side of the window.

- You will be prompted to pick a location to share the system image backup. You can pick any of the 3 options. For this example, I’m going to use a USB hard drive. Tap or click Next.

You will see a screen outlining what will be backed up. Tap or click Start Backup to proceed with the backup.
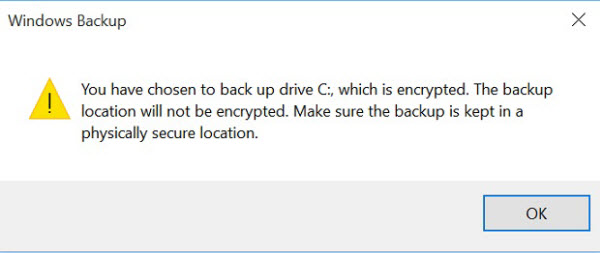
If you have BitLocker turned on, you will get a warning like the one below. If you do, tap or click OK then Start Backup to proceed.
The backup will take some time to complete. I would plan on it taking, at least, a half-hour. You should make sure your Surface stays connected to power the entire time.
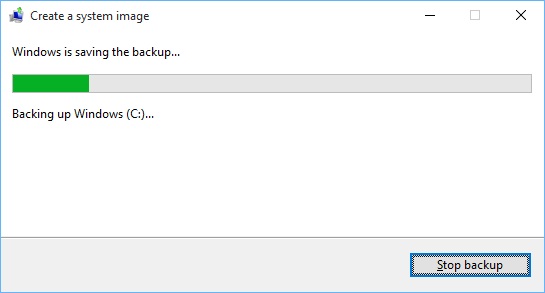
If you need to, for some reason, you can stop the backup operation by tapping or clicking Stop Backup. Doing so will not damage your Surface but it will render the backup unusable.
Restore a System Image Backup in Windows 10
Of course, creating the system image is only half the process. In order to be useful, you need to be able to restore the image. Since system images are best used as disaster recovery backups, let’s assume your Surface is only bootable from a Recovery Drive (which, conveniently, was covered in Part 3 of this series).
Restore a System Image from a Recovery Drive:
- Make sure you know where the system image (you want to restore from) is located and that it’s available (i.e. you have your backup USB hard drive with you).
- Connect your Surface to power.
- If you can, copy off files that might have changed between now and the date of the system image.
- Boot from your recovery drive and select Troubleshoot from the available options.

- From the troubleshooting options, select Advanced Options then System Image Recovery and follow the on-screen directions. You will be asked to provide the system image to restore from at some point.

If needs be, you can do the restore from within Windows at the Backup and Restore (Windows 7) screen from the restore section highlighted below:
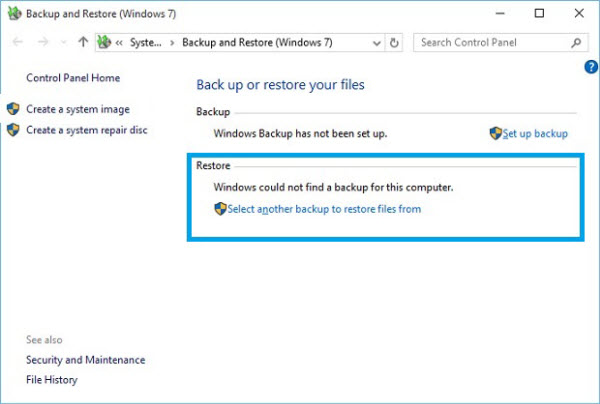
If you choose to do the restore from here, the same basic process applies (keep connected to power, know where your system image is located, follow the on-screen instructions).
How Often Should I Make a System Image Backup?
If you want, you can make one nightly but, if you’ve followed the advice from the earlier parts of this series, and you’re using OneDrive and File History backups, I would recommend you perform a System image backup no more than monthly. Personally, I do mine just prior to applying patches.
I would also recommend that you keep, at least, the system images from the previous 2 months and delete older ones to save space on your backup drive. That way, you have a fallback in the event your latest image gets corrupted.
Wanna a one-step solution for your multimedia problem on Windows 10? iFastime Video Converter Ultimate is a professional program in ripping Blu-ray/DVD/HD video for playback, storage or editing. It can rip the latest 3D/2D Blu-ray and DVD and convert any kinds of video files to various video formats for some popular smartphones and tablets as well as editing software. And you can add srt/ass/ssa subtitles to the output videos to make it unique and perfect. Especially it can convert 3D video files to 3D MKV/MP4/MOV/WMV/AVI format now. Simple interface and CUDA acceleration will bring you an easy but effective conversion. Mac version is also available.
More Topics:
- Google To Challenge Apple TV With Chromecast 2
- Here’s The Latest On Google Inc. Upcoming Nexus Smartphones
- iPad Mini 4 Vs iPad Mini 3 Vs iPad Mini 2: What's The Difference
- iOS 9 vs. iOS 8 – Important Changes You Should Know About
- iOS 9 for iPhone/iPad: Download and install Apple's newest operating system
- Apple Allowing Developers Who Won Apple TV Lottery to Place Orders
No comments:
Post a Comment